Gel nail polish is a fantastic beauty innovation. It offers a dazzling, chip-free shine that can last for weeks. But all good things must come to an end, and when it’s time for a change, knowing how to remove your gel polish correctly is crucial. Improper removal is the number one cause of nail damage, including thinning, peeling, and weakness. With the right tools and a little patience, however, you can safely remove your gel manicure at home and keep your natural nails healthy and strong.
What You’ll Need: Gathering Your Products
Before you begin, it’s essential to have all your manicure supplies ready. Trying to improvise can lead to messy situations and damaged nails. Here’s your checklist:
- 100% Acetone: This is non-negotiable. While regular nail polish remover might seem like a gentler option, it’s not strong enough to break down gel polish. 100% pure acetone is the most effective choice.
- Aluminum Foil: You’ll use this to create little wraps that hold the acetone-soaked cotton against your nails.
- Cotton Balls or Pads: These are perfect for holding the acetone. You can pull them apart to the right size for each nail.
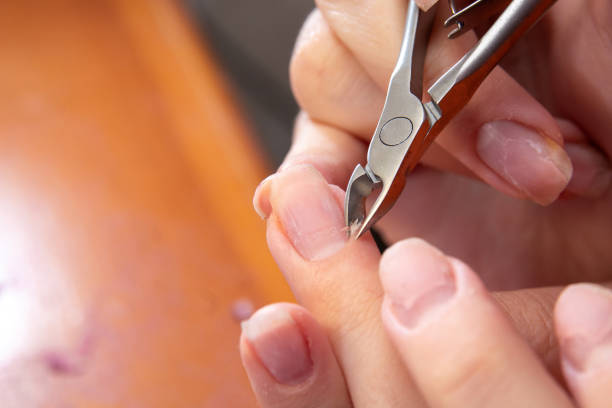
- An Orange Wood Stick or a Cuticle Pusher: This tool is your best friend for gently scraping off the softened gel.
- A Nail File (with a coarse grit): You’ll need this to break the top seal of the gel polish.
- A Hand Towel or Cloth: For any accidental spills and to keep your workspace clean.
- Cuticle Oil and a Rich Hand Cream: The most important part of the after-care process!
The Step-by-Step Removal Process
Once you have all your products assembled, find a comfortable, well-ventilated space to work in. Acetone has strong fumes, so an open window is a good idea.
Step 1: File the Shiny Top Layer
Use your coarse-grit nail file to gently buff the shiny top coat of your gel polish. You don’t need to file all the way down to your natural nail; your goal is simply to rough up the surface and break the seal. This creates tiny channels that will allow the acetone to penetrate the gel layers more effectively.
Step 2: Prepare the Acetone Soaks
Tear your cotton balls or pads into pieces large enough to cover your entire nail. Soak each piece thoroughly in the acetone. Place one soaked cotton piece directly onto a nail.
Step 3: Create the Foil Wraps
Tear your aluminum foil into small squares, about 3×3 inches each. Carefully wrap a piece of foil around your fingertip, securing the acetone-soaked cotton firmly against the nail. Make sure it’s snug but not painfully tight. Repeat this process for all ten fingers.
Step 4: The Waiting Game
This is the part that requires the most patience. You need to let the acetone do its work. Sit back and relax for about 10-15 minutes. You can set a timer. If you feel a slight warming sensation, don’t be alarmed—this is normal.
Step 5: Gently Remove the Gel
After your timer goes off, test one nail. Press down on the foil-wrapped nail and gently twist the foil off. Take your orange wood stick and gently push the gel polish from the surface of your nail. If it’s ready, the polish should slide off in a gooey sheet or easy scrapings. Do not force it! If it doesn’t budge easily, re-wrap that nail and wait another 5 minutes.

Step 6: Buff and Clean
Once all the gel is off, your nails might feel a bit rough or have some residue. You can gently buff the surface with the fine-grit side of your nail file to smooth them out. Then, wash your hands thoroughly with soap and water to remove all the acetone residue.
Important “Don’ts” and Warnings
Your nails are vulnerable after this process, so it’s vital to avoid these common mistakes:
- Never Peel or Pick Gel Polish Off. This is the most damaging thing you can do. Peeling removes not just the polish but also layers of your natural nail, leaving them thin, weak, and prone to peeling for months.
- Don’t Scrape Too Hard. If the polish isn’t coming off easily, it means you haven’t soaked it long enough. Forcing it with a metal tool can gouge and scratch your nail plate.
- Avoid Water Before Removal. Try not to do this process right after a shower or washing dishes. Hydrated nails are softer and more susceptible to damage during removal.
- Be Mindful of Your Skin. Acetone is very drying. Try to keep it concentrated on the nail and not the surrounding skin. If it does get on your skin, don’t worry—just wash and moisturize thoroughly afterward.
Post-Removal Nail Care: The Recovery Phase
Your nails have just been through a chemical process and need some TLC to recover.
1. Hydrate Immediately: As soon as you’ve washed and dried your hands, this is your first priority. Massage a generous amount of cuticle oil into your nail beds and cuticles. Jojoba oil is an excellent choice as its molecules are small enough to penetrate the nail plate. Follow up with a thick, nourishing hand cream.
2. Take a Break: Give your nails a break from any polish for at least a few days, if not a full week. This allows them to “breathe” and regain their natural strength and moisture balance.
3. Keep Nails Short: Consider filing your nails a bit shorter than usual to prevent snagging and breaking while they are in a weaker state.
4. Maintain a Routine: Make cuticle oil your new best friend. Apply it at least twice a day—once in the morning and once before bed. This consistent hydration is the key to preventing peeling and promoting healthy nail growth.
Removing gel nail polish doesn’t have to be a scary or damaging experience. By following these simple steps and treating your nails with care afterward, you can enjoy the benefits of a beautiful gel manicure without compromising the health of your natural nails. Happy, healthy nails are always in style
Read also: Manicure: Nail Preparation